
So you’ve been relying on Salesforce.com’s mass email functionality to reach prospective customers? How’s that going for you? While we know it's not perfect, sales teams do prefer it over tools like Constant Contact, iContact, Pinpointe, Mail Chimp, ActOn, or Hubspot. That's because Salesforce keeps the email campaign in sync with our overall sales effort.
Still, if your mass email open rate is less than 8%, we think you could be doing better. Your problem is likely one of two things. Either (a) your target lists aren’t well-honed or (b) your mass emails are selling you short. If it’s the former, take a look at our tips for prospecting here. If it’s the latter, the following is a quick fix that you can implement by just formatting the Salesforce email template.
Mass emails are impersonal and are often considered the “easy way out.” But salespeople don’t have time to send individual emails to all their prospects. So the key is to send mass emails that look like personal emails and can still be tracked with HTML reporting. There’s no ideal solution, but here’s the best step-by-step process for doing that with Salesforce’s mass email feature.
First, you have to create a “Blank” template to replace Salesforce’s default one. By this, we mean no header or footer and with margins as slim as Salesforce allows. If you’re not sure how to do this, we’ve provided instructions here. To get started with the mass email template, start below. Step 1
Go into the "setup" section of Salesforce. It’s located in the drop-down menu that appears after clicking on your user name (top right of your homepage).
Step 2
On the main page for "Setup," click on the "Email” section. It’s second from the top, underneath "My Personal Information." Select the "Create or Edit Email Template" link.
Step 3
Select the "New Template" button, which appears above the lists of existing email templates.
Step 4
Select the "HTML (using Letterhead)" option under the "Choose the type of email template you would like to create" question. Then hit the "Next" button.
Step 5
Complete the fields as follows:
-
Folder: This depends on the purpose of the email you're creating, but your default should be "Unified Public Email Templates." This ensures that everyone in your organization can use it.
-
Available for Use: This box MUST be checked, otherwise the template doesn't appear in your options when creating a new email.
-
Email Template Name: Make it unique/similar to whatever you will put in the subject line of the email.
-
Letterhead: Choose the fancy new "Blank," letterhead you created.
-
Email Layout: Choose "Free Form Letter."
-
Encoding: Leave as "General US & Western..."
-
Description: If the Template Name is descriptive enough, you can just copy and paste it into this field. Otherwise, provide a better description of the email blast.
Then hit "Next."
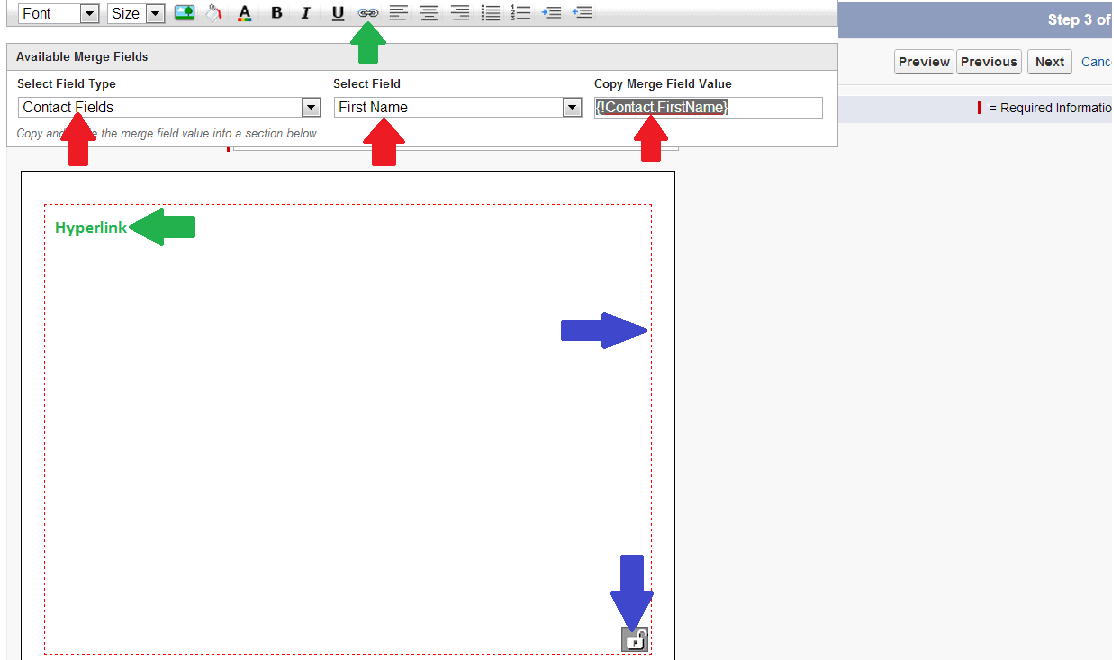
Step 6
These tips are color-coded in the screenshot below.
Red: To instruct an email template to pull information from the Salesforce record you are emailing, you must use the "Merge Field Value." For example, to have an email auto-generate the first name of the contact you are reaching out to with a greeting like "Dear (First name),” use the Value in the field below.
Green: To insert a link in a template, you will need to first type the type the text you’d like to be linked in the body, then highlight the text and click on the chain-link icon on the top bar. That will pop open a box into which you need to paste the actual hyperlink.
Blue: To type the body of your email, first make sure the dotted perimeter line is red. To do that, you need to click into the actual body of the email with you cursor. Also, to make sure that you will be able to edit the template before you send a one-off email to someone through Salesforce, make sure the Lock" icon is unlocked.
Once you're done with these steps and have drafted your email into the body, hit "Next."
Step 7
In the text version, to keep things simple, just select the "Copy text from HTML version" button, then hit Save.
Now you’re ready to start sending and selling!